
Hi I’m Dr Megha Cassandra!
I am a Watercolor Artist and Certified Art Therapy Facilitator with a deep passion for helping others express themselves through art. Based in Bangalore, India, I’ve been teaching art courses and conducting workshops since 2020, focusing on mental well-being, self-expression, and emotional healing. Having personally experienced the healing power of art, I am committed to helping others unlock their emotional strength and creativity. Art is not only a creative expression; it's a journey towards emotional healing and self-discovery. Art has been my guide through life's challenges and I now dedicate myself to facilitating healing and connection in others.
Expensive materials don't make a good artist but the right techniques do! It is also my way of giving back what all I have learned in 25 plus years.

Mental Well Being with Art Therapy
Discover the profound connection between art and healing. Art therapy isn’t about creating masterpieces; it’s a journey of self-expression, mindfulness, and emotional growth. Through guided workshops and therapeutic programs, unlock your inner creativity, manage stress and foster self-awareness—all in a safe and supportive space.
Explore Art TherapyThe Art Shop

Access insightful eBooks and bring home stunning art prints.

Learn at your own pace with our expertly designed art courses.

Own unique, hand-crafted artworks that speak to your soul.

Participate in therapeutic Art workshops that provides a safe, creative space for emotional healing, stress relief, self-discovery & mindfulness.

Unlock exclusive access to art therapy sessions, guided tutorials, community meetups, and curated resources designed to inspire and support your creative journey. Become a part of a vibrant community dedicated to self-expression and healing through art.
Become a MemberYouTube


Unlock Your Creative Potential Through Structured Courses
Whether you're a beginner or looking to refine your skills, our courses are designed to help you learn at your own pace. Explore a range of topics, from watercolor techniques to art therapy, and discover the transformative power of creativity. Join a community of learners and enhance your artistic journey today.
ExploreBLOGS

I have never met anyone who doesn’t like to paint roses! What beauty this lovely flower beholds! If painting realistic watercolor rose was on your painting wish list, then you can tick it off today! In this post I will take you through 7 easy steps that will help you paint a realistic watercolor rosebud.
“Of all flowers, methinks a rose is best.”
– William Shakespeare
Materials: Professional Artist Grade Watercolors, No 8 Round Brush, No 4 or No. 3 Round Brush, Mixing Palatte, 2 Jars of Water, Tissue, 100% Cotton Watercolor paper – Cold Pressed
Techniques- We will be using both Wet on Wet and Wet on Dry techniques and Detailing

Whether you are painting roses or any other realistic Flowers, here are the 6 Secrets that you should know,
Choose the right materials- Don’t settle for cheap materials! Although right techniques are more important than this but right materials can make a big difference in your outcome. Good quality paper, brushes with good tip, vibrant transparent colors will make it look more realistic.
Understand your reference – Observe the colors, shape, proportion, layers, details etc. with a lot of attention this will make the task easy for you. Take time to study all these by paying attention to all the details.
Always sketch very lightly – This is very important as watercolors are transparent in nature and the visible pencil marks will ruin the beauty of your painting.
Use the right techniques – Get your techniques right, WOW, WOD, Dry brush. blending etc. , So you know what to use where
Don’t over do – With practice you will know more clearly which technique to use when and this will help you paint better
Have patience! – Art in general requires patience, but with realistic paintings this virtue is a must and is very important!
Real life reference – Simply choose real rose flower, this would be easier if you are painting for a while. If you are a complete beginner than avoid using this as it wont be very easy to do. Also this will be time bound as you must finish before the rose withers!
Picture from internet- If you intent to use the painting ONLY for personal use, that means not even sharing it in part on any social channel, just go for it! Use whatever you like! This is great option! But if that’s not the case you should be very careful when doing this, if it is out there on the net does NOT mean its free to use however you like, even the photos on Wikipedia might have certain rights, so always read the usage rights thoroughly and carefully without fail.
Using the Painting of another artist- Copying another is anyways a no no! This is ethically wrong and can be very disrespectful to the Artist. This is the least recommended even if you are doing this strictly for personal use, copying can never be justified. This has many cons, if you aspire to be a realistic artist then this method will hinder that in a big way as the very essence will be lost ,and also you will just be copying (including their mistakes) instead of using your own creativity and effort.
Your own reference- This is the best way! No copyright issues, easier to paint than real life, if you have multiple angles you have more scope to learn. No hurry to paint! You don’t have to be a professional photographer to collect your own references, just a smart phone and little creativity is enough. These days so many amazing editing tools are available and you can easily use that to enhance your pictures and give them a professional touch. And this is what we will be using in this tutorial.

Although Sketching is optional with watercolors, with this it will really be helpful, all you have to do is sketch very lightly the main outline. Turn the photo into black and white version, reduce increase contrast, shadows, brightness etc. till you feel that it is easy to to sketch.

If sketching is not your thing then just go ahead and trace, there is nothing wrong with it. You can use tracing paper, butter paper, light box, print and trace using a window etc.
Another one is Grid method and this is very accurate and beginner friendly too. You will never go out of proportion with this! If tracing is something you don’t like then this is the best way. This is my favorite too, saves times, give the assurance that you drew it and it is time and effort saving!
Choose your color palette as per the picture, but since you are an artist you have the liberty to choose your own tones! Always swatch the colors, only mix you own colors if you are familiar with color theory and can do this effortlessly. You can also check this FREE Color Theory guide HERE for a basic intro.
You can grab the Color set HERE.

Once sketching is done, lighten your sketch a much as you can as watercolors are transparent and we don’t want any see through pencil marks,. You are now ready to add Paint!
We will be using wet on wet
First layer the petal base color and spread it all through
Next add the second color while it is still wet, start with dropping and the color let it spread on its own beautifully
Next blend to mix
While still wet , lift color to make the light, refer to the reference picture
Pick up any extra color using the brush and wiping in the tissue
Other details will be done later
Complete all the petals in the same way
Once you are done with the petals, move on to the sepal.
Again we will use wet on wet
Start with a layer of watery yellow
Then add the green and let it spread
Next add darker tones referring to the picture
Details will be added in the end
Next we will move on to painting leaves,
Again we will use wet on wet
Start with a layer of watery yellow
Add the green
Next add darker tones referring as per the the picture
Details will be added in the end
Lastly the final touches like, veins of the leaves, dots or fine lines on the rosebud.
We will use wet on dry for detailing
Add lines to the petal
Add finer points to the sepal
Add dots and dark lines to the sepal
Add deep pink to highlight the rose bud
So that’s about it! If you break it down in simple steps it becomes really easy to do!
Do share your version with me, I would love to see it and share on my social channels, you can tag me @bytheartbug!If you prefer Video you can check it out here on my YT Channel,
Until next time,
Whether you are a beginner or a pro, these are handy tips that you should know if you love painting miniatures. Painting of any type requires some skill and when it comes to miniatures it can be a little challenging if you don’t have the right tools, right mindset and the right techniques in place. In this post we will discuss 13 must know secrets for Miniature Watercolor Artists to create better paintings!

Miniature paintings are also called limning and they date back to the 3rd century. They got their name from a medieval painting technique used by the Artists of 16th & 17Th century, they used to paint using minimum also known as Red Lead.
A miniature (from the Latin verb miniare, “to colour with minium”, a red lead) is a small illustration used to decorate an ancient or medieval illuminated manuscript; the simple illustrations of the early codices having been miniated or delineated with that pigment.
Source: en.wikipedia.org
The earliest miniature painting can be traced back to 7th century AD! These were so intricate and very detailed even though tiny. It is really amazing that the artists of that time used to paint such intricate details without the use of any fancy tools! Over the centuries the art of painting miniatures has come a long way. The modern versions are are different from the older ones but the techniques involved are mostly the same. With modern tools it can be said that is a little easier for the artists to create even the tiny details more clearly. But still it requires a lot of skill and precision but with practice you can become a pro at it!
Download the Cheat sheet here for quick reference!
Before we hop on to 13 must know secrets for Miniature Watercolor Artists to create better paintings lets check out,
Small but not cheap – You art might be small but that does not mean it will be cheap! Miniatures carry even more value due to the difficult nature of the making process.
If you have the right tools the process becomes so much easier and also comfortable. Sometimes we don’t have the right tools and give up easily because of that. The frustration of not getting it right can be sometimes due to the use of incorrect tools and materials. For example you can’t just use any paper for watercolor, it has to be specific 100 percent cotton paper to get the best possible results. With that said, I won’t encourage you to get the best possible stuff available out there, but a bare minimum is a must. If you are confused about what to buy and how to buy or how to start on a budget, you can check my FREE guide here!
As for miniatures you can use smaller version of the same material, like small paper, mini sketchbook or cut it to size, lower number brushes or detailing brushes and the paint anyways remains the same.
The magnifier also comes in very handy if you want to see the details clearly, I personally find it difficult to use, so I never use it! So it is totally up to you whatever suits you!

The right mindset is needed for anything you do! Isn’t it? Don’t just assume that miniatures are very difficult just by looking at other Artists work. Give it a try first! Paint at least 15-20 miniatures and then decide. Never give up or quit unless you give it your 100 Percent.
Nothing is impossible.
The word itself says “I’m possible!”
-Audrey Hepburn
It is very important to have a stable hand and for this you need to practice, forget about paintings, first start with the drill even before you think about painting something. Warming up is vert important. When I am painting miniatures I like to doodle a few lines and patterns just to make sure I have a steady hand and the brush has a good point! A little warm up will always set you on the right path whether you are a beginner or at a more advanced level.

Watercolors are mostly transparent and if you draw dark it will be hard to hide the pencil marks with the paint unlike other opaque mediums, and it can totally ruin your work. That’s why always remember to sketch very lightly if are doing so.
Don’t go ahead of yourself and start with something very challenging, if you do that although it may sound very brave but you will end up giving up too soon. So remember to paint something very simple when you begin.
Does not matter whether you are using miniature brushes or regular smaller number brushes the brush point has to be good. The whole of miniature painting is like adding very intricate details even when you are painting the background! So be careful about this, good point is a must not just for adding the details but required just for painting miniatures.
Always paint in good natural light, avoid painting at night at all costs if you can, no matter how many bright lights you put it will strain your eyes, if you try doing that in artificial light. A mix of natural and artificial works best for me.

Dirty water is a call for disaster! Unlike other mediums the transparency of Watercolors can not handle even the slightest of dirt, else you will get muddy results.9. Right amount of Water. You have to be really careful with the amount of water on the brush, a little extra can turn the game around, always keep tissue handy and be mindful of the amount of water you are using.10. The Right Size Matters, don’t just directly jump on the smallest possible size to paint, always start with something that you can comfortably do and then come down to smaller size.
What is considered a Miniature,
An often-used definition is that a piece of miniature art can be held in the palm of the hand, or that it covers less than 25 square inches or 100 cm².
Source: Wikipedia

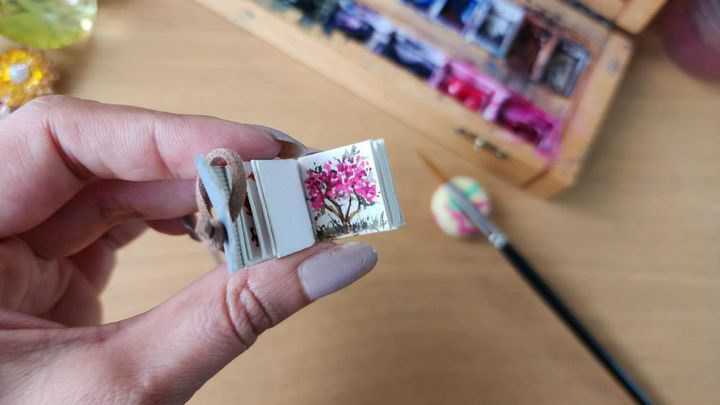
So it can be anywhere between a palm sized miniature and a Micro Miniature like this one, smaller than a Nail!
With watercolors you have to be careful with layers, study your painting mentally first and plan how you will go about it. Remember light to dark is the key!Do your Layers Right
No matter what you do don’t forget to have fun. Unless you enjoy the process you are not going to like it.
This is the only key! Remember there is no short cut! No matter how expensive your supplies are or what all fancy tools you have, you will not become good at it unless you practice. Keep at least 15 minutes everyday and paint something.

Artists I hope these tips will come in handy and enhance your miniature painting skills!
Till next time,

Creative Services for Healing and Growth
“I could say things with color & shape
that I couldn’t say any other way
– things I had no words for…”
– Margaret Naumburg
Art Therapy Workshops for Individuals and Groups
Unlock emotional healing and self-awareness through creative expression. My workshops focus on-
Explore the joy of watercolor—perfect for all skill levels, from beginners to advanced artists.
More than paintings—each piece tells a story, evokes emotion and adds beauty to a personal space that feels truly yours!

Creative practices to improve your Mental Well-being
Art therapy is about the process, not the result. Just 10–15 minutes a day can bring calm, focus and self-connection.
“Art is not about pretty things;
it’s about who we are
& how our lives are affected.”
– Elizabeth Broun
Heartfelt Stories from my Community
Its a really good session. Really helps to overcome from stressful life. And this art therapy helpful more for a working people. Thanks Megha mam for great session.
Chinnamma B


Life is full of challenges. We all have them. Art has helped me through my own deep valleys.
- Sarah Jio


